

Back in 2009 I acquired an original Mustang 4-speed "Toploader" transmission with the intention of retrofitting it into my 1968 Fastback. While this seemed like a great idea at the time, I knew that it would be silly to just fit a 40+ year old transmission without at least stripping it down and ensuring it was in full working order.
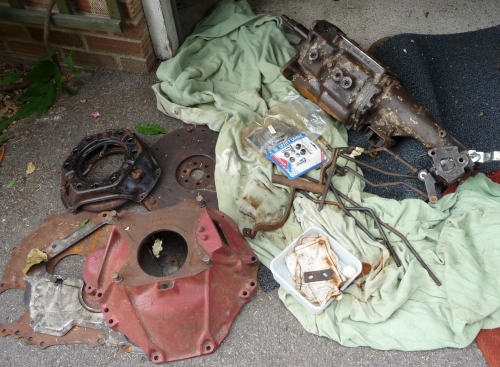
Here's the pile of sorry looking parts I got along with the Toploader transmission...
This page is a chronicle of how I rebuilt this transmission, where I got the parts from and a brief "how-to" on certain items, which may be useful to other would be DIY rebuilders/enthusiasts. Hopefully you will find this reference useful.
- Matt
Step 1 - Decoding / Identifying the Ford "Toploader" Transmission
I’ve learned the hard way that before you can rebuild anything, you first need to know what you have in-front of you. Before you can order any parts or even know if the transmission is worth rebuilding, you need to know what you've got. The Ford 4-speed Toploader transmission is no different, while they have great value in the US and Canada, the original 4-speeds are less common outside of the continental US than their automatic brethren and as a result, parts are much harder to find.
Providing an exhaustive list of the different "Toploader" transmission types and variants is very much beyond the scope of this simple page. If you need to identify something specific, there's lots of useful (and useless) information available online. Here's a couple of useful hints, tips and websites that I personally found useful...
There are several key pieces of information which can help you to identify which transmission you have, these are:
- Build Tag - Riveted to the main case of the transmission
- Main Case Casting Number - Found in the side of the transmission main case
- Tail-housing Casting Number - Found in the side of the transmission main case
- Counter-Gear Tooth Count - Identify if a Wide-Ratio or Close-Ratio gear set (requires transmission disassembly)
- David Kee Toploaders - ID Chart
However, if you’re unfortunate enough to get a transmission that has the “build tag” removed or broken like me, don’t fret you can still identify it by various other means. The David Kee website delivers again in providing excellent information to help in this regard…
Main Case Identification: Main Case ID Chart
Tail Housing Identification: Tail-Housing ID Chart
Bell Housing Identification: Bell-housing ID Chart
Here's an image showing the main case casting number location...
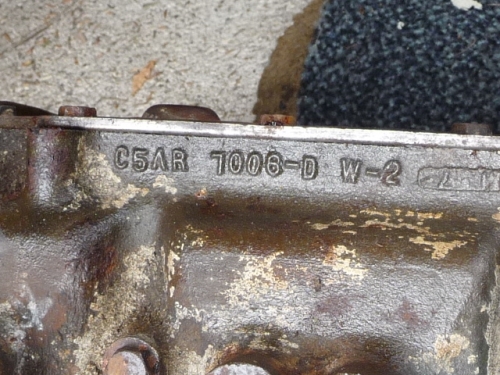
Here's a quick breakdown of the casting number shown in the image above...
| Main Case - Casting Number Decode | ||
|---|---|---|
| C | Decade | 1960s |
| 5 | Year of decade | 5th year = 1965 |
| A | Model design | Full Size Ford |
| R | Engineering Component | Manual Transmission |
| 7006 | Basic Part Number | Transmission, drivetrain and clutch related |
| D | Engineering Revision | 4th part revision |
Ford more details of how to decode for part and casting numbers see the fantastic and very useful Mustang Tek website.
Armed with the knowledge of what transmission you have and the specification, you can order a rebuild kit from you preferred supplier. I found that Mark at Toploader Heaven very knowledgeable, great to deal with and he also offers a kit with special tools to help the DIY or first-time rebuilder like me to perform their own transmission rebuild, but more on this later.
| Useful "Toploader" Parts Supplier Index (U.S. companies) | |
|---|---|
| Toploader Heaven | Toploader Specialist, highly recommended. |
| David Kee Toploader Transmissions Inc. | Toploader Specialist. |
| Medatronics Corp. | US Manual Transmission Specialist (see Paul Cangialosi's book review here). |
| Cobra Automotive | Motorsport Specialist, including modified Toploader transmissions for historic racing. |
| National Parts Depot | Restoration parts specialist, including the sale of toploader parts. |
Step 2 - Transmission (external) Inspection and Tear-down
At this point it's probably a good idea to stop and really consider if you have the time, tools, patience and know-how to tear-down and rebuild a transmission. Even some professional machanics/technicians wouldn't consider a transmission rebuild a "normal" job and would outsource to a specialist.
This section assumes that the transmission has already been removed from the vehicle and that you have a safe, clean and well lit area to work in. If you don't know how to remove a transmission safely from a vehicle, you should also probably give the job of performing the rebuild to a professional.
Now for the default disclaimer... I will take no responsibility for your decision to try and rebuild your own transmission, or your own screw ups! This page has been written for information purposes only, use references, information or tips provided at your own risk!
If you're still convinced you want to have a go, read on...
You're going to need some tools not normally found in the average toolbox, but many of the more specialist tools are provided in the kit from Toploader Heaven. The list of tools I used includes:
- Various AF Sockets and Spanners (wrenches)
- Torque Wrench
- Snap-Ring Pliers
- Tailshaft bushing installation tool (within the Toploader Heaven rebuild kit)
- Detent and interlock pin removal tool (within the Toploader Heaven rebuild kit)
- Various punches, drifts and chisels
- Plastic freezer bags (for storing small parts removed)
- Notepad and a pencil (for labelling parts, pencil won't come off in transmission oil like ink may)
- Various wooden blocks
- Hammer
- Digital Camera (to take photos of things to remind you of how they fit together)
- Tyre Marker, Paint-Pen or Tip-Ex (to mark parts in relation to each other, e.g. synchroniser assemblies)
- A pack of cold beers (to ease those "blue" moments)
External Inspection
There are a few things you can check while the transmission is in one piece...
Input Shaft Spline Condition
Visually inspect the input shaft splines for wear and damage. If the transmission has seen many high RPM launches at the drag strip, the splines can become damaged (twisted or stripped) from the shock loads applied by hard launches. These pieces are very strong, but severe abuse can break them just the same.
If the splines are damaged, plan to replace the input shaft and don't be surprised if you find more issues inside.
Input Shaft Rotation and gear engagement
Check that the input shaft can be rotated freely and smoothly. There should be no grinding or gritty feel in any selected gear. Also be sure to check that the shift-levers are free to move, they will be stiff probably, but don't force anything.
Input Shaft lateral play
A very easy way to check the condition of the input shaft bearing is by checking for lateral movement of the input shaft. Given that the Toploader uses a ball-bearing (as opposed to a tapered roller bearing on more modern transmissions) there will be some minor lateral movement. However, this shouldn't be excessive. If the tip of the input shaft can be moved with more than a 1mm deflection the bearing (in my opinion) should be replaced.
Case Condition
Look for damaged threads, cracks or broken castings. The cases are very strong being made of cast-iron, but they can be brittle and break if subject impact.
Oil and Drain-plug inspection
Checking if there's steel or iron particles in the oil, or on the magnetic drain-plug will tell you how regularly the transmission has been serviced and if there could be an internal damage or excessive wear.
At this point I'll bow out to the excellent references provided by Mark at Toploader Heaven and authors Paul Cangialosi and Robert Bowen who clearly outline the "right" way to disassemble a Toploader. The only thing I'll add in terms of advice is, take your time, label and bag everything as you disassemble it. Don't forget to mark the relationship between synchroniser assembly parts using a tyre marker or tip-ex as listed in the tools kit above.
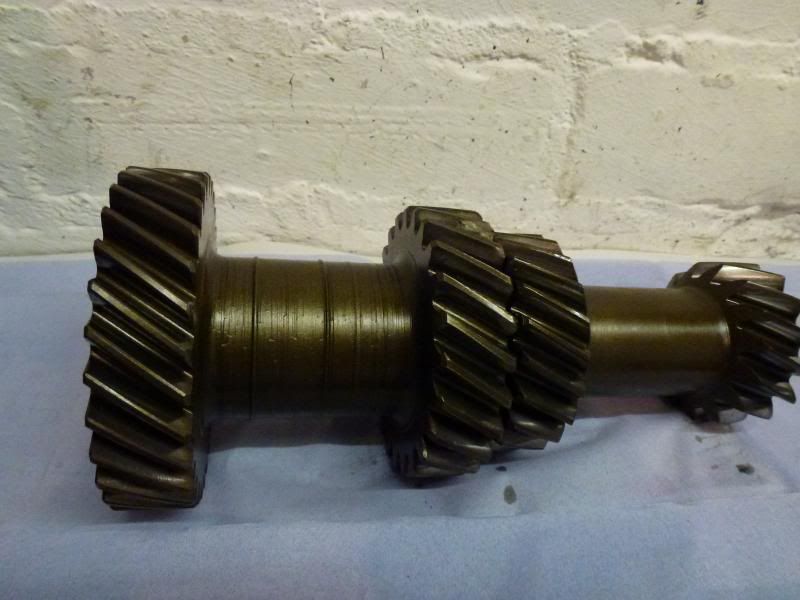
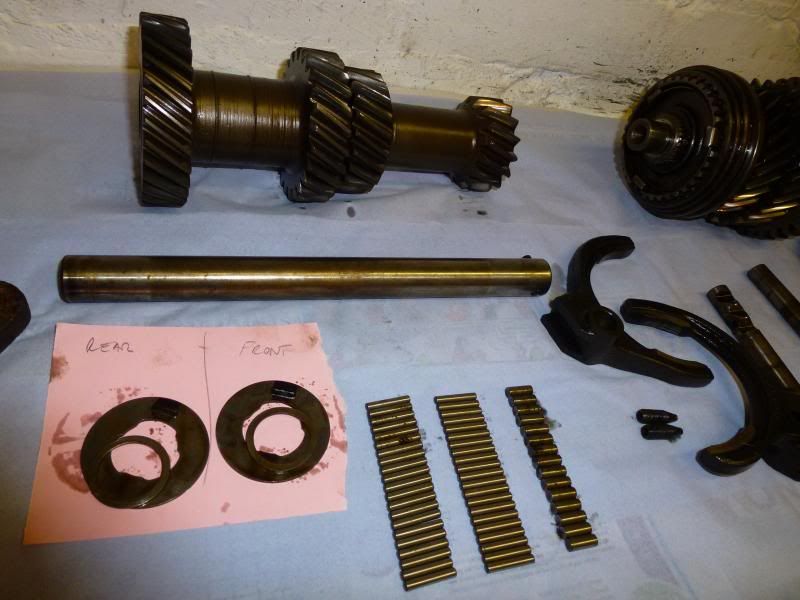
Here are some pictures showing some of the main components within my 1965 Mustang Toploader after being partially torn down.
 |
 |
The keen eyes among you will already spot some potential issues with wear, dirt and the broken detent spring. More on these issues within the next section.
Step 3 - Transmission (internal) Inspection and Diagrams
This section isn't really a blow-by-blow account of what to look for when rebuilding a manual transmission, but rather a chronicle of my own experiences and the items I encountered while rebuilding my own transmission.
Probably the most useful item I had to assist me when rebuilding the transmission was a good exploded diagram, like the one shown based on the original Ford technical publications drawings. I have a copy of the original Ford workshop manual for 1968 models and it has some great references, along with those provided by Mark at Toploader Heaven.
Ford Toploader 4-speed exploded diagram: Exploded Diagram (David Kee Toploader Transmissions Inc.)
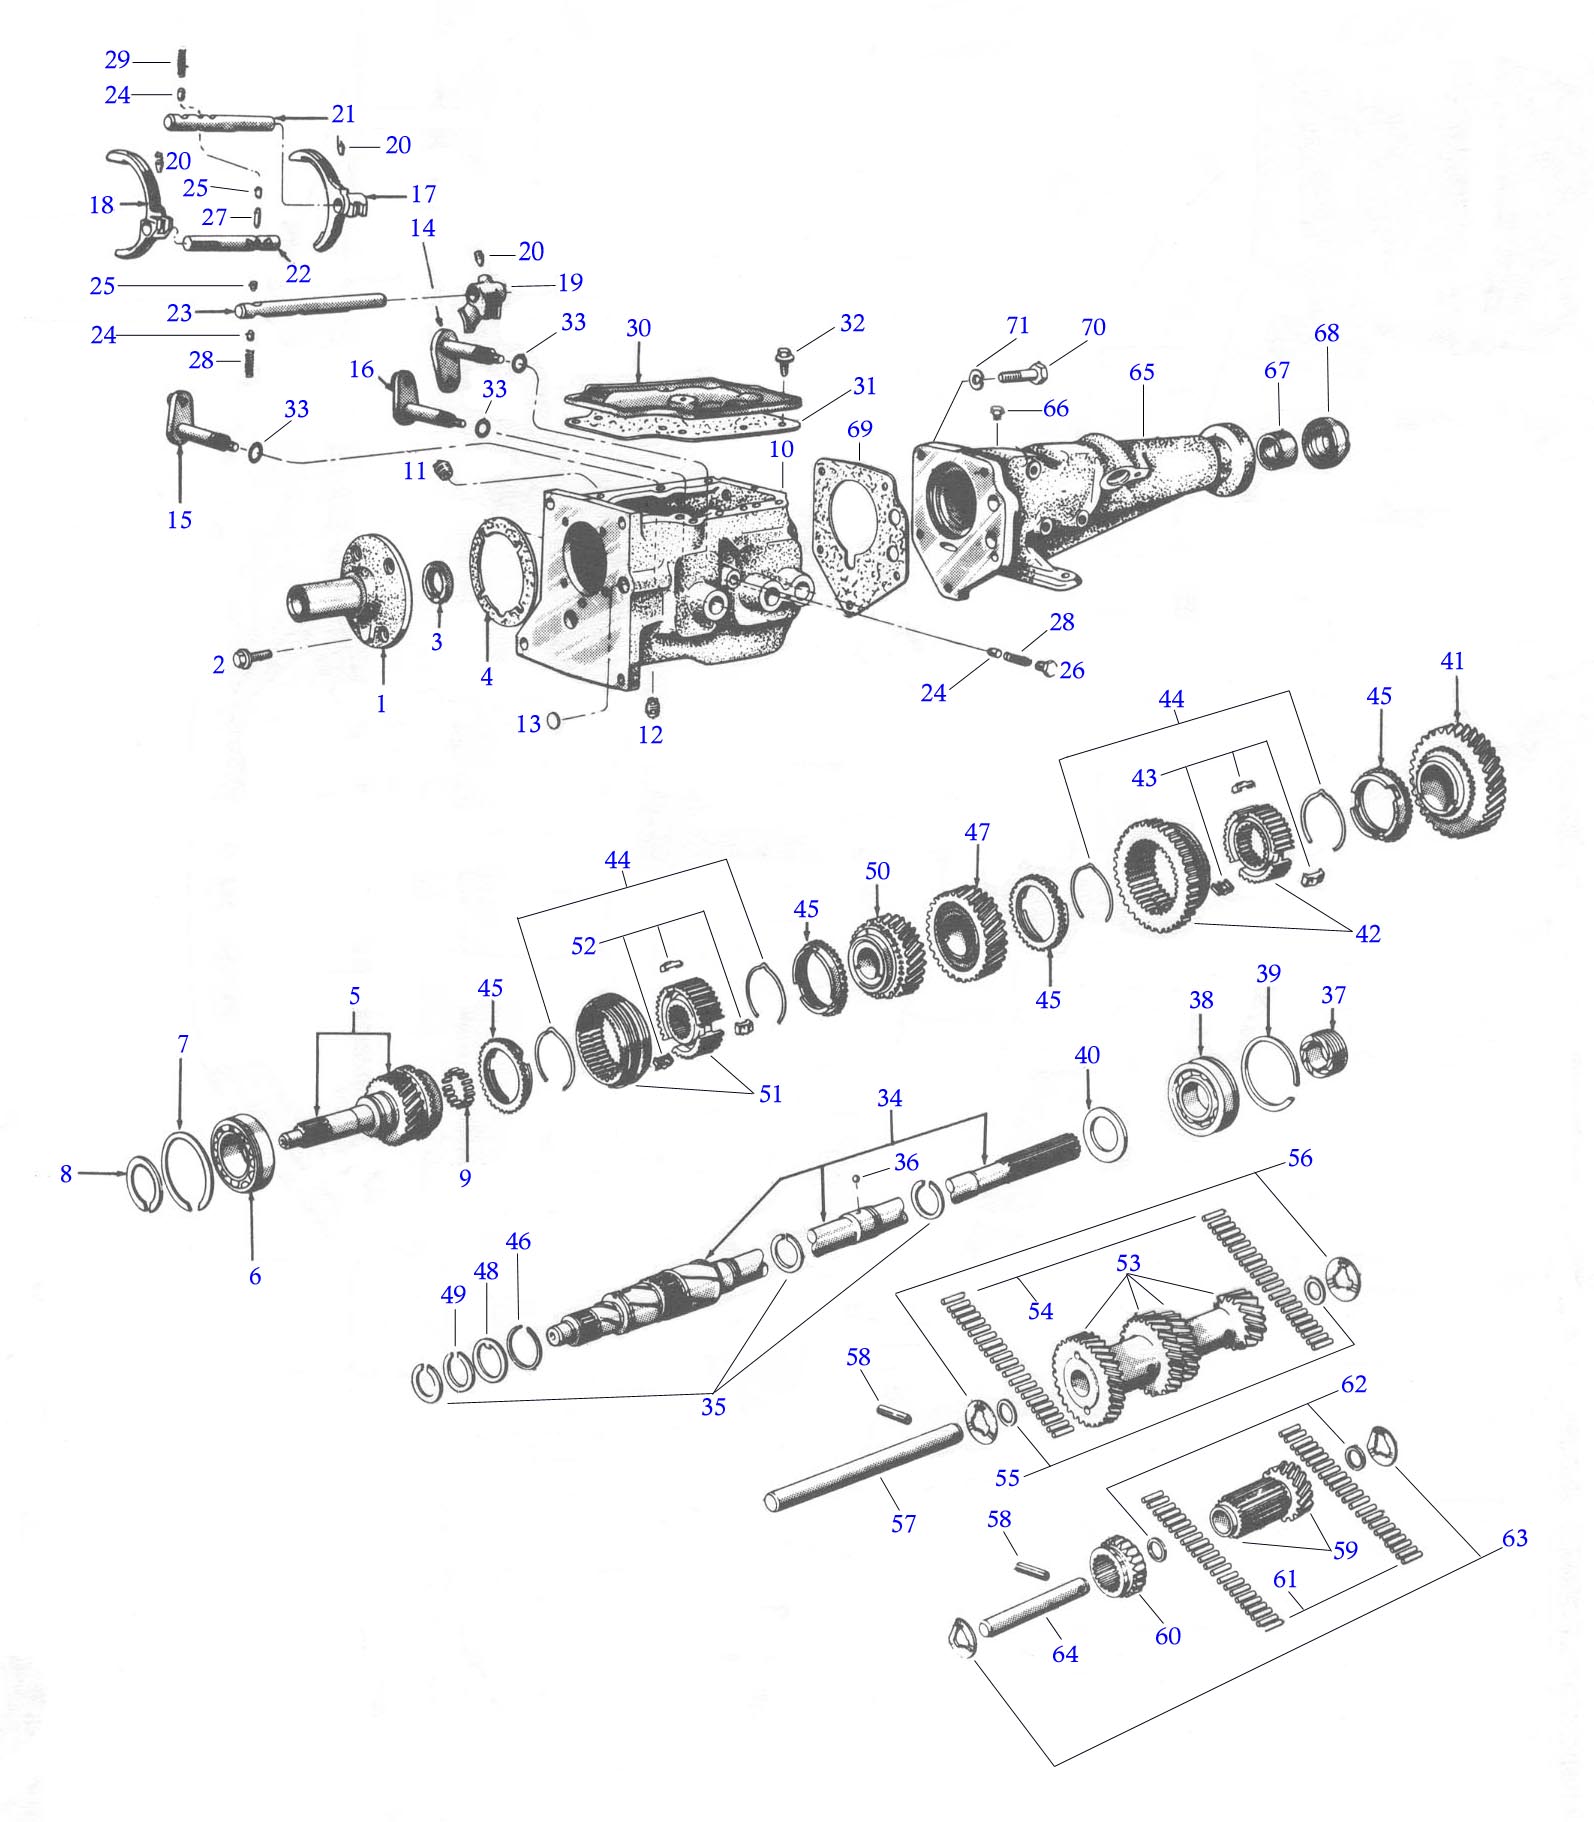 |
Check closely for wear and pitting on the needle rollers and cluster/counter gear shaft, most good rebuild kits include these parts along with replacement thrust washers & needle roller spacers as they're commonly worn.
 |
 |
Here's a couple of useful references that may help with step 3...
- Inside the Mighty Toploader - Part 2: Inspection & Evaluation - 4 page article. (hosted by Randal's Restorations Inc, TX USA)
* More Information being added - Please come back soon *
Step 4 - Reassembly
Not wanting to play down the superb guide I received from Mark at Toploader Heaven, with a little ingenuity and know-how many DIY mechanics could rebuild a toploader transmission. But here's a few tips that may help along the way...
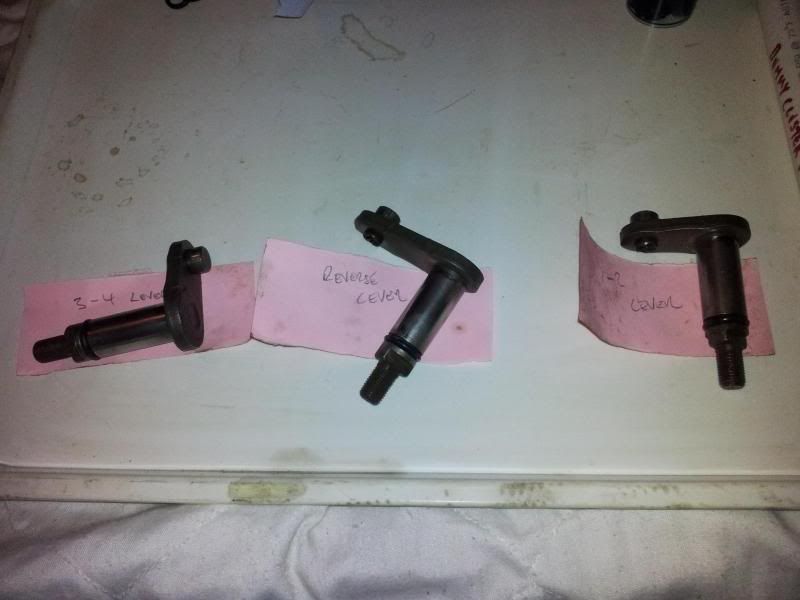
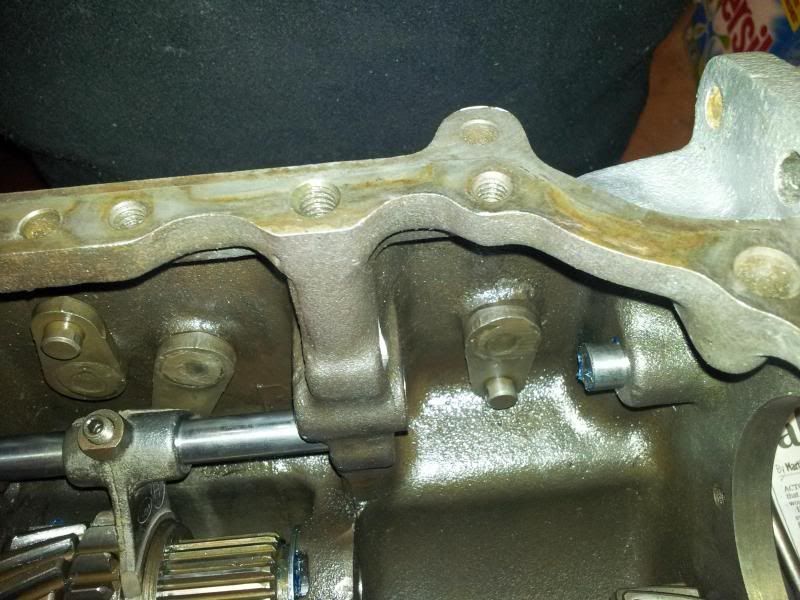
If the shift levers aren't heavily pitted or worn they can be re-used. I re-polished the levers and fully cleaned their bores within the transmission main case to ensure there would be no galling, which could cause problems when shifting gear. Fit the new O-ring seals, liberally lubricate with fresh gear oil and install into the main case in their respective positions.
 |
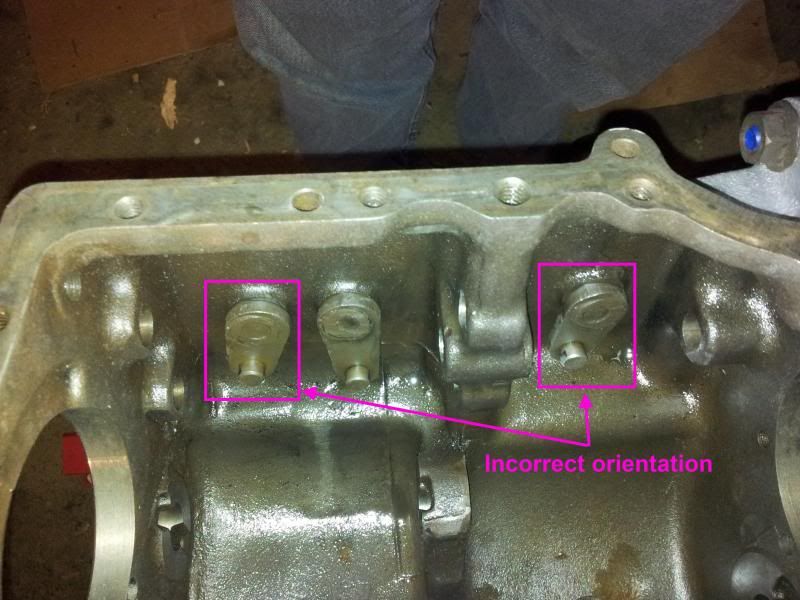 |
TIP: Please note the correct position/rotation of the 1-2 and 3-4 shift levers point towards the top of the case, while the only the longer reverse lever points downwards (as highlighted in the photo above). Don't make the same mistake I did!
I also was able to clean and re-polish the 3x shift rods and detent pins which had jammed in the case due to lack of use and lubrication. Again, ensuring these items have a good polished finish and operate smoothly for nice clean and reliable shifts.
 |
 |
Here's a couple of useful references that may help with step 4...
- Inside the Mighty Toploader - Part 3: Assembly - 10 page article. (hosted by Randal's Restorations Inc, TX USA)
* More Information being is always being added - Please come back soon *
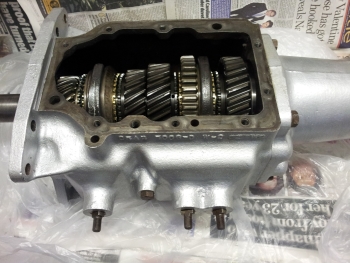
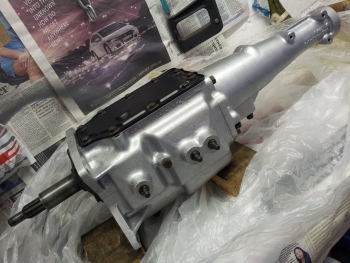
The Finished Article - Completed Ford "Toploader" Transmission
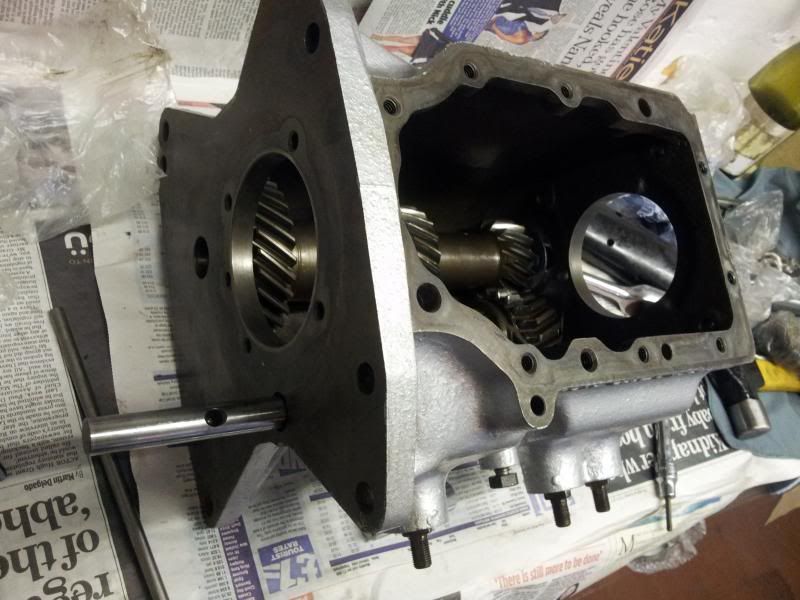
Here's a couple of images showing the reassembled transmission. While it's not exactly "concours correct", it is clean, tidy and ready to deliver another 40+ years of service.
 |
 |
In you wanted to achieve a durable but more factory correct look, I'd recommend the superb "cast blast" paint finishes from Eastwood in the US. These superb paints are also available from Frost in the UK.
Here are a couple of other useful "Toploader" references:
- Art Richardson's "71-73 4-speed concours detailing" page
- How To: Mustang Toploader transmission rebuild - 3 page article. (published by Mustang Monthly Magazine, USA)
- How To: Fix a manual shifter - Single page article. (published by Mustang Monthly Magazine, USA)
Hopefully this page can inspire other would-be DIY rebuilders to have a go at rebuilding their own Ford Toploader transmissions. Not only does it save money, it's also very satisfying!
- Matt